
How to check your SSD health in Windows 10 and Windows 11
Last updated: 30 October 2026
If you want to know how long do SSDs last, start by checking your drive’s health. To check SSD health, open SSDLife and read the health percentage on the main screen. The number comes from the drive’s own wear counters and S.M.A.R.T. data, so you do not have to interpret raw attributes. If you would rather not install anything, run Get-PhysicalDisk in PowerShell. It reports a health status, but not the wear level.
What an SSD health check actually measures
An SSD does not report one true health number. It keeps counters: how much of its rated write endurance you have used, how many spare blocks are left, and how many read or write operations had to be retried or remapped. Tools read those counters and turn them into a percentage.
The percentage answers one question: how much of the drive’s rated life is left on paper. Error counters answer another: whether the drive is behaving. A drive at 80% with zero reallocated sectors is usually in better shape than a drive at 95% that remapped twenty sectors last week. Both numbers matter, and neither one replaces a backup.
Way 1: check SSD health with SSDLife
- Download SSDLife and run the installer.
- The main window shows the health percentage, temperature and remaining life for the drive. The Free version covers one drive; Pro adds all of them.
- Open the S.M.A.R.T. tab to see the full attribute table. The detailed table is part of Pro.
- Leave it running in the tray. It is a small program and it stays out of the way until something changes.
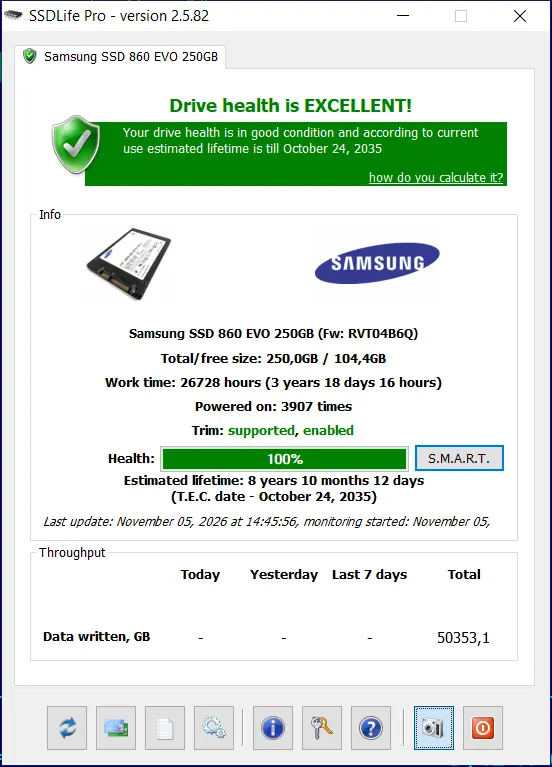
The health percentage is worth watching over time, but a single reading from today says little. Write down what it says. If it drops two or three points in a month, look at the error counters. If it sits still for a year, the drive is fine.
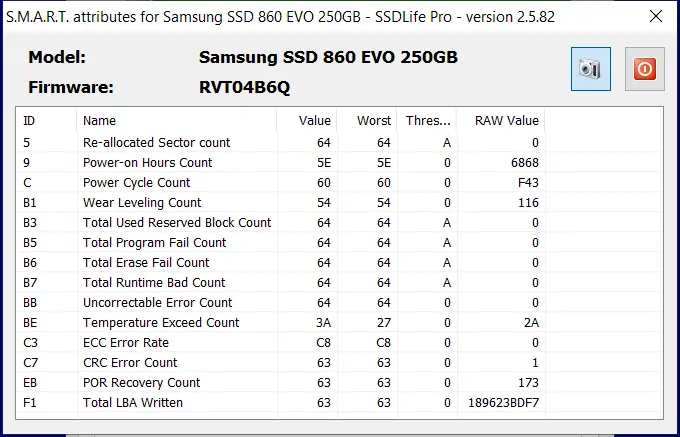
SSDLife Pro automates the checking part with SmartCheck. It runs on a schedule and only reports when something changes. The Free version shows health and temperature when you open it.
If you do not want an installer, use the portable build. It comes as a ZIP that you unpack first.
Download SSDLife Free
Runs on Windows 10 and 11. The free version monitors one drive; Pro ($19) covers all of them and adds the full S.M.A.R.T. table.
Way 2: check SSD health with Windows built-in tools
Windows can tell you whether a drive is healthy, but it will not tell you how worn it is. Open PowerShell and run:
Get-PhysicalDisk | Select-Object FriendlyName, MediaType, HealthStatus, OperationalStatus
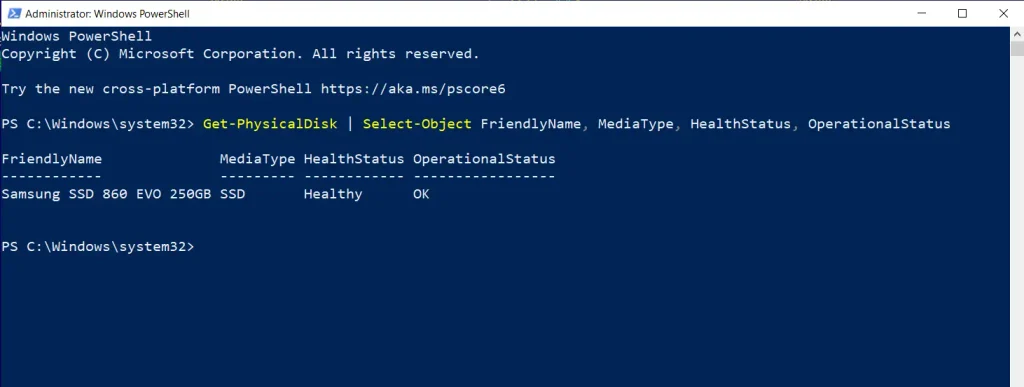
You get one row per drive. HealthStatus is Healthy, Warning or Unhealthy. Warning usually means the drive reported a problem to Windows, and Unhealthy means it is failing now. A Healthy status only means Windows has not seen a failure, so it is not the same as a good wear level.
For a wear number, try:
Get-PhysicalDisk | Get-StorageReliabilityCounter
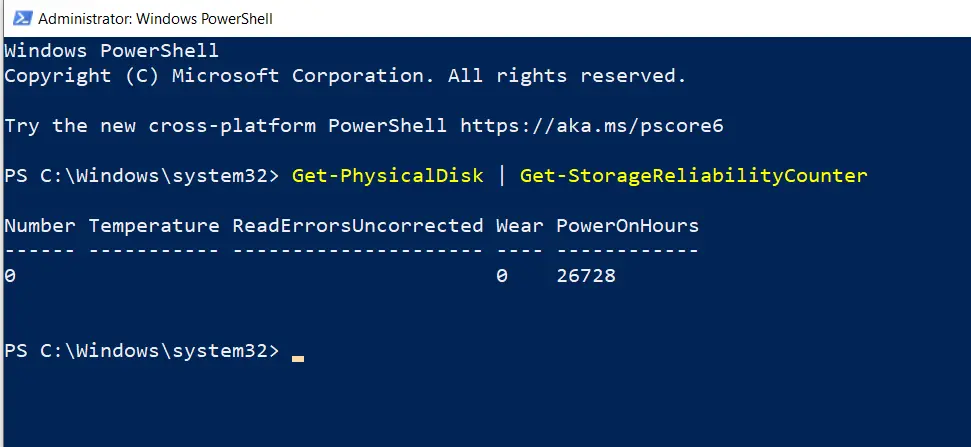
On SATA drives that support it, the Wear field shows the percentage of the rated endurance already used. Many NVMe drivers and USB enclosures return an empty table, so this command works on some machines and not on others.
Older guides suggest wmic diskdrive get model,status,size. It still works on many Windows 10 machines, but Windows 11 24H2 does not install WMIC by default, so on a current system the PowerShell route is the one to use.
Two Windows features look like health checks and are not. Optimize Drives runs TRIM and retrim on an SSD, which keeps write speed up but says nothing about wear. The disk properties in Settings show capacity, format and partition style. Neither one has a wear counter, so a green tick there is not a clean bill of health.
Way 3: check SSD health with the manufacturer’s utility
Samsung Magician, Crucial Storage Executive, WD Dashboard and Kingston SSD Manager all read their own brand in more detail than Windows does: firmware version, remaining endurance, sometimes the exact number of bytes written. Two limits apply. Each tool only accepts its own brand, so you need one per drive. None of them keep watching after you close the window, and a slow failure is exactly the case that needs watching.
Which method should you use
| Method | Shows | Wear level | NVMe | Cost |
|---|---|---|---|---|
| PowerShell Get-PhysicalDisk | Health status, model, media type | No | Yes | Free |
| SSDLife | Health %, temperature, remaining life, S.M.A.R.T. | Yes, SATA | No, planned for 2027 | Free, Pro $19 |
| Vendor utility | Drive-specific S.M.A.R.T., firmware, benchmarks | Usually | Own brand only | Free |
PowerShell is the option when the machine is not yours and you cannot install anything. The vendor utility is worth opening once, for firmware details or a secure erase. On your own machine the useful question is whether the drive is getting worse, and that needs a tool which keeps records between checks.
How often should you check SSD health
Once a month is enough for a home machine. The counters move slowly, and a drive that loses one point a year does not need weekly attention. Check more often in three cases: right after you install a new drive, while you are doing sustained writes such as video editing or virtual machines, and on a laptop that runs hot. Also check before you buy a used drive, because the wear level is the one number a seller cannot hide.
If the machine is one you depend on for work, run the check on the same day each month and keep the readings in one note with the date next to them. Two readings a month apart show the direction, and the direction is what decides whether you buy a drive now or in a year.
How to read the numbers
90-100%: the drive is close to new.
70-89%: normal wear for a drive that has been in use for a few years.
30-69%: keep backups current and watch the trend.
Below 30%: replace the drive, especially in a laptop you depend on.
The percentage alone does not tell you whether the drive is healthy. These counters matter more:
- reallocated sectors above zero and rising (attribute 05)
- current pending sectors above zero (C5)
- uncorrectable sectors above zero (C6)
- media and data integrity errors above zero on NVMe (0E)
- available spare below the drive’s own threshold (03)
Attribute numbers are the same on most SATA drives, but vendors add and rename fields, so read the label next to the code, not only the code. Two programs can also show different percentages for the same drive, because each one picks a different attribute or estimates from host writes. Pick one tool, watch its number over time, and do not compare it with a screenshot from another program.
TBW is the endurance rating, the number of terabytes the manufacturer expects you to write before the drive reaches the end of its rated life. A 500 GB drive rated at 300 TBW and a 1 TB drive rated at 600 TBW wear at about the same rate if you write the same amount of data, because the rating scales with capacity. SSDLife turns those counters into a percentage, so you do not have to convert TBW to gigabytes written. The rating is still useful in one place: when you compare two drives before buying.
When to replace the drive
Replace the drive when the health percentage falls below 30, when reallocated or pending sectors are above zero and climbing, or when the drive drops out of Windows under load. Freezes, corrupted files and failed Windows updates can also be early signs, but they have other causes too, so check the counters before you buy anything.
A failing SSD rarely stops all at once. It remaps sectors, gets slower, and gives you a warning or two that most people ignore. Copy anything you cannot re-download while the drive is still readable.
If the drive already shows reallocated sectors, see how we recovered an SSD with failed sectors.
A note on NVMe drives
SSDLife works with SATA SSDs only. NVMe and M.2 PCIe support is planned for 2027. On an NVMe drive, use the manufacturer utility or smartctl; Windows itself shows only a health status.
The NVMe SSD health check page covers what Windows and vendor tools can show on M.2 drives.
FAQ
Before you buy anything, check what your drive reports. Download SSDLife Free and look at the health percentage; it takes a minute.
BinarySense makes SSDLife and HDDLife, drive monitoring tools for Windows. Both read S.M.A.R.T. data and warn before a drive fails.
Avviso sugli SSD NVMe e M.2
Supporto NVMe previsto per il 2027
L'attuale architettura di monitoraggio è completamente ottimizzata per i protocolli di archiviazione basati su SATA. Stiamo sviluppando attivamente set di comandi NVMe avanzati per interpretare accuratamente i dati dei moderni controller PCIe.
Per ulteriori informazioni sulle prossime funzionalità, visita la nostra pagina di controllo dello stato di salute dell'SSD NVMe.


 English
 Deutsch
 Français
 Español
 Italiano
 Português
 Português do Brasil